Goodwill Alterations with Chanté Gibbs
Chanté is a local thrift blogger and sustainable designer. She is our inspiration and guide to exploring what can be done with some creative alterations and updates of thrifted finds. Each month she starts with a concept, shops our stores, and reworks her thrift finds into high-fashion pieces. She takes us on a thrift journey from start to finish, and it’s a great ride every month!
")
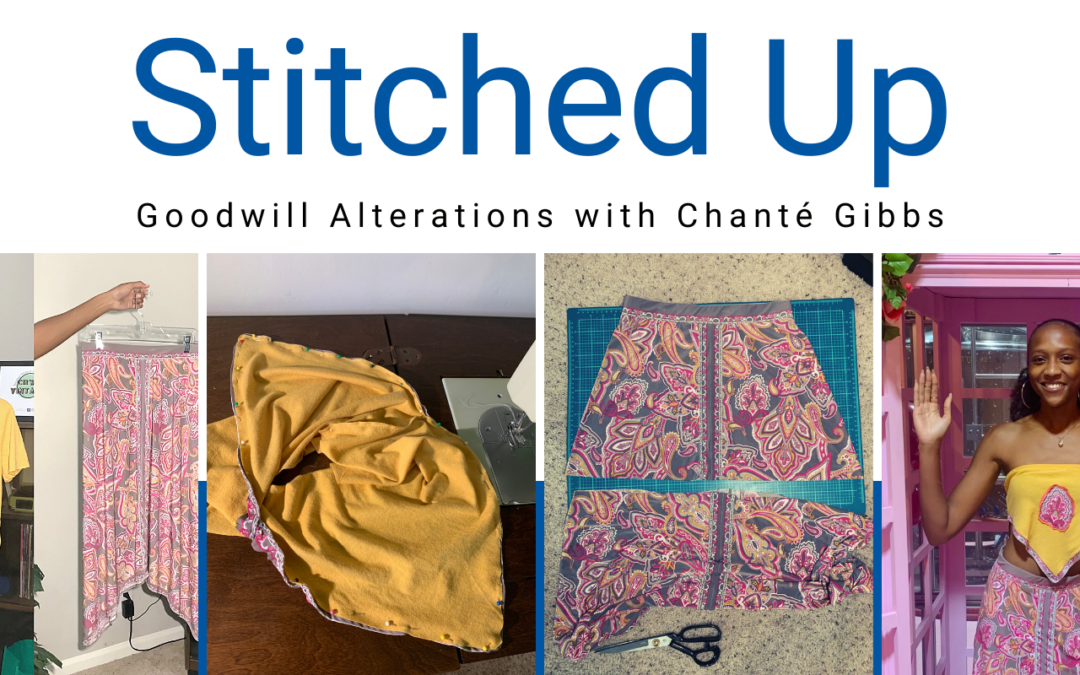
DIY Barbie!
Before heading to Goodwill, I knew I wanted to find a top and bottom that was similar to the Barbie Fashionista Doll #198. I got lucky in the short sleeve shirt section and found a vibrant mustard yellow Forever 21 t-shirt. It was in good shape and big enough for me to turn into a crop top.
Next, I looked through the pants section but couldn’t find one with a similar floral pattern. So I wandered over to the skirts and eventually found a pretty paisley pattern. I really loved how flowy it was and the multiple colors in it, and I decided that I could make a skirt work instead for this month’s Stitched Up.
How do I make it?
Paisley Skirt
- After washing the items, I tried on the skirt to check the fit and marked where I wanted to cut.
- Before I started cutting though, I ironed both the t-shirt and skirt to get all the wrinkles out. This helps with the cutting and sewing process.
- I placed the skirt on my cutting mat and used a ruler to create a clean horizontal line then cut along it. At this point, I tried on the skirt again to see if I needed to cut anymore off before grabbing the excess fabric to use as trim for the new shirt.
Bandeau Crop Top
- To make the flower on the front of the Barbie’s shirt, I put together unused fabric and an old thrifted tank top. I cut out a piece of the paisley pattern from the skirt that sorta resembled a flower, and then used a piece of the tank top for the outline.
- With that done, I put it and the skirt to the side to start focusing on the t-shirt. Back on the cutting mat, I drew a horizontal line near the armpits. But before cutting, I used a crop top from my closet to determine my measurements for the side of the new shirt. I made two diagonal lines from where I marked the sides of the armpits towards the bottom of the shirt to create two triangles on both the front and back of the shirt. Then I used my shears to cut along the diagonal lines, creating the points on my crop top.
- With the shirt inside out, I pinned and sewed the sides of it together. After that, I pinned and sewed the paisley trim I had set aside (from hemming the bottom of the skirt earlier).
- For final touches, I sewed the flower front and center on the bandeau shirt, just like Barbie, and added an elastic band to the top. (To add an elastic band on a piece of clothing, fold over the top with about an inch gap to be able to insert the elastic, then sew the edge to the item of clothing to form a band. Then insert some fresh elastic and sew the gap closed.)
")
")
")
")
What was your inspiration?
Halloween! I thought it would be the perfect time to create my own Barbie costume, with my own personal style of course. I came across a Vogue article about a popular collector of 600 Black Barbie Dolls, saw Barbie Fashionista Doll #198 and knew I had found my inspiration.
Thrift Shopping Tip!
Keep an eye out for weekly sales, coupons, or special events at your local thrift stores! A good way to do this is to follow them on social media or sign up for text alerts.
Credits
Photos were taken by my fiancé. The final piece was modeled and styled by me.
Follow Chanté
")