Two of my favorite things are Halloween and crafts, so coming up with a DIY Halloween craft was right up my alley. Like most people, my first source of inspiration was good ol’ Pinterest. Immediately I was bombarded with adorable and spooky upcycled and affordable crafts I could pull together using items found at my local Triad Goodwill. The “pin” that really caught my eye was a fun, easy, and affordable DIY using wine glasses and some paint. I was immediately on board.
All together this craft cost me less than $10 and only took a few hours. Plus, they are super cute and will look great both indoors and outdoors with Halloween!
Here’s what you need to create your own unique haunted Halloween candle holder:
- wine glass- any shape(s) you’d like
- spray paint- any color that goes with the design you want to create
- black Sharpie marker
- twine, ribbon, rope, gauze, etc.
- hot glue gun
- nail polish or paint
- any other bedazzlements you want (googly eyes, glitter, etc.)
- tea, votive, or pillar candle
Step 1: Shop & Prep
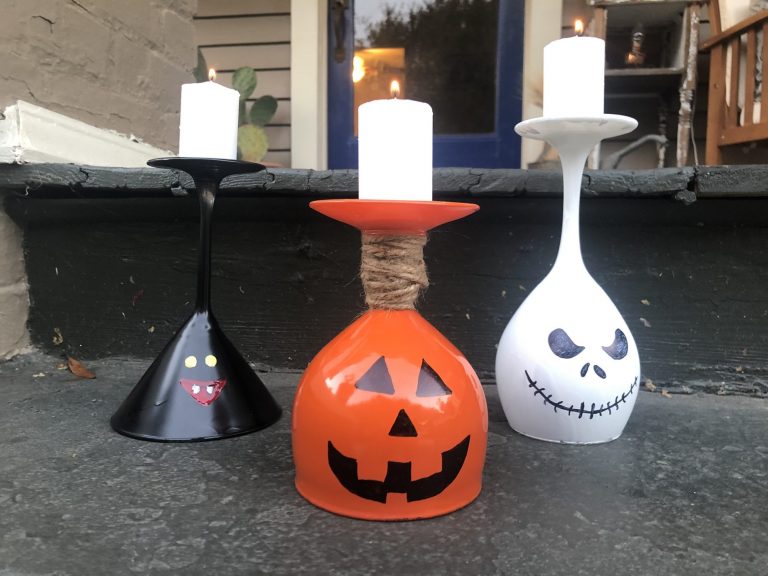
Pick out a variety of wine and / martini glasses. I went with one very round, red wine glass for my pumpkin, a standard wine glass for the ghost and a classic martini glass for my bat / goblin.
Remove any stickers from the glasses. Wash and dry, and wipe down with a cloth to ensure no dust lingers.

Step 2: Paint
Spray paint each glass in a well ventilated area. Since it was nice this Saturday I decided to paint outdoors before the rain came. Spray in a sweeping motion, top to bottom. I recommend using a towel under the glass so you can spin the towel vs. having to touch the glass or move around it.
Spray with at least 2 coats.
*pro-tip: the white primer worked great for the ghost since it dries a matte color vs. glossy like the others!


Step 3: Draw the Face
Once your paint has dried, it’s time to decorate! I used trusty Pinterest again to get some ideas for creating a ghost / skeleton face, as well as the pumpkin and bat face.
Use your Sharpie to draw your faces or free-hand like I did with the bat / goblin face.
For the bat / goblin face, I used nail polish since I did not have any traditional paint. It worked just fine and didn’t cost anything extra!

Step 4: Decorating
Since I didn’t want to splurge on additional paint and didn’t have green nail polish, I opted to use some twine I use for wrapping presents to create my pumpkin “stem.” I simple wrapped a long piece around the stem of the glass multiple times (to create some thickness) and secured the end with a dot of hot glue. Easy peasy!

Step 5: Light Your Candles
Now that the hard work is done, pop your candle size of choice onto the top, light the wick, and sit back to enjoy your craftiness!
You can pat yourself on the back even more when you finish this project, because not only did you save a few buck and create a cute one of a kind decoration, but you helped people in your local community gain meaningful employment or training. Whenever you shop at your local Triad Goodwill 85 cents goes back to the mission of low-cost and free job training!
Donate, Shop, Recycle, Train, Work- That’s Triad Goodwill!
